

A plugin is a software component that adds additional functionality or functionality to a program or system without having to change its underlying code. In the context of web development such as WordPress, a plugin is a software module that extends the functionality of a site, usually adding new features, functionality, or integrations.
How to create your own plugin?
Creating your own WordPress plugin can be quite simple. Here are the step-by-step instructions:
- Create a new directory for your plugin: You need to create a new folder in the wp-content/plugins/ directory of your WordPress site. The name of this folder will be the name of your plugin.
- Create a plugin file: Inside the new folder, create a file with a .php extension. This file will be the main file of your plugin.
- Add a plugin header: At the beginning of the PHP file, add a plugin header that includes the name, description, version, and other information about the plugin. For example:
<?php
/*
Plugin Name: Название вашего плагина
Description: Краткое описание вашего плагина
Version: 1.0
Author: Ваше имя
*/- Add plugin functionality code: In the main file of your plugin, you can add any PHP code that implements the functionality you need. For example, this could be code that adds new features to your site or changes existing ones.
- Save the plugin file: After adding all the desired functionality, save the plugin file.
- Activate the plugin: Go to the Plugins page in the admin panel of your WordPress site and find your plugin in the list. Click “Activate” to launch your plugin.
- Testing and Debugging: After activating the plugin, make sure it works correctly and does not cause errors on your site. Debug if necessary.
Это основные шаги по созданию простого плагина для WordPress. Дальше вы можете расширить функциональность вашего плагина, добавлять пользовательские параметры и настройки, создавать пользовательские страницы администрирования и т.д. Вам та
Описание моего плагина
These are the basic steps to create a simple WordPress plugin. Next, you can expand the functionality of your plugin, add custom parameters and settings, create custom admin pages, etc. You are the one
How to configure the plugin?

After activation, fields appear in your profile that you can fill out
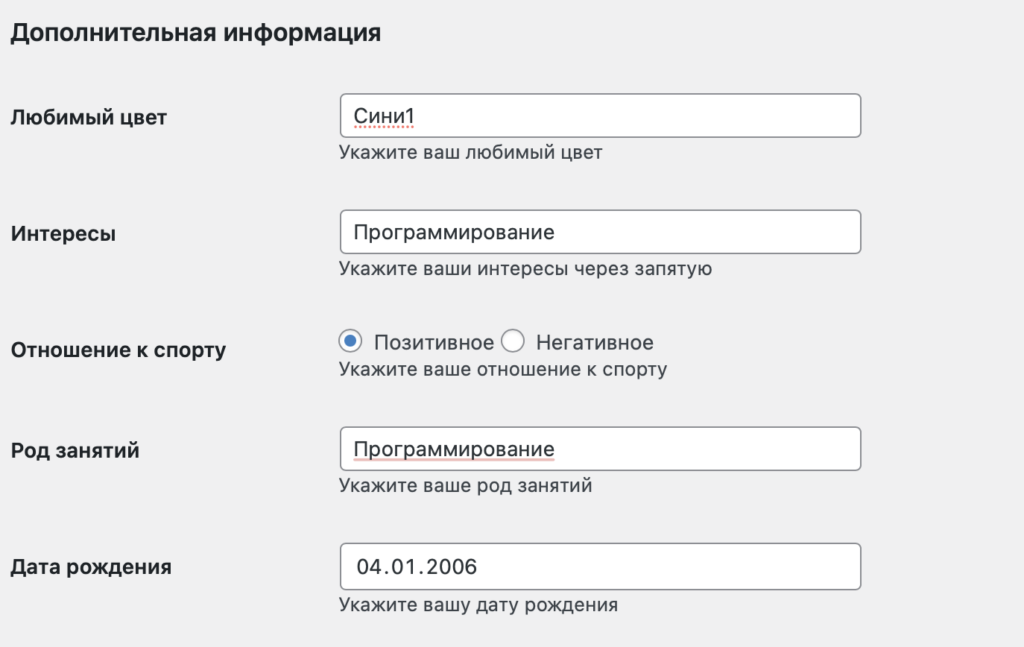
Then you click the save button
Plugin code
<?php
/*
Plugin Name: Additional fields in the user profile
Description: Плагин позволет после акивации добавить в свой профиль еще несколько полей о себе, например интересы, отношение к спорту и так далее
Version: 1.0
Author: Максим Дочкин

*/


   function custom_user_profile_fields  ($user) {


    ?>
    <h3>Дополнительная информация</h3>

    <table class="form-table">

        <tr>
            <th><label for="favorite_color">Любимый цвет</label></th>
            <td>

                <input type="text" name="favorite_color" id="favorite_color" value="<?php echo esc_attr(get_the_author_meta('favorite_color', $user->ID)); ?>" class="regular-text" /><br />
                <span class="description" >Укажите ваш любимый цвет</span>
            </td>
        </tr>
        <tr>
            <th><label for="interests">Интересы</label></th>


            <td>
                <input type="text" name="interests"   id="interests" value="<?php echo esc_attr(get_the_author_meta('interests', $user->ID)); ?>" class="regular-text" /><br />
                <span class="description">Укажите ваши интересы через запятую</span>
            </td>
        </tr>
        <tr>

            <th><label for="sport_attitude">Отношение к спорту</label></th>
            <td>
                <label><input type="radio" name="sport_attitude" value="positive" <?php checked(get_the_author_meta('sport_attitude', $user->ID), 'positive'); ?>> Позитивное</label>
                <label><input type="radio" name="sport_attitude" value="negative" <?php checked(get_the_author_meta('sport_attitude', $user->ID), 'negative'); ?>> Негативное</label>
                <br />

                <span class="description">Укажите ваше отношение к спорту</span>


            </td>


        </tr >

        <tr>
            <th>  <label for="occupation">Род занятий</label></th>
            <td>
                <input  type="text" name="occupation" id="occupation"    value="<?php echo esc_attr(get_the_author_meta('occupation', $user->ID)); ?>" class="regular-text" /><br />
                <span class="description">Укажите ваше род занятий</span>
            </td>
        </tr>
        <tr>
            <th><label for="birth_date">Дата рождения</label></th>
            <td>

                <input type="date"   name="birth_date" id="birth_date" value="<?php echo esc_attr(get_the_author_meta('birth_date', $user->ID)); ?>" class="regular-text" /><br />
                <span class="description">Укажите вашу дату рождения</span>
            </td>
        </tr>


</table>


            <?php
}
add_action('show_user_profile', 'custom_user_profile_fields');
add_action('edit_user_profile', 'custom_user_profile_fields');


function save_custom_user_profile_fields($user_id) {

    if (!current_user_can('edit_user', $user_id)) {
        return false;
    }


    update_user_meta($user_id, 'favorite_color', sanitize_text_field($_POST['favorite_color']));
    update_user_meta($user_id, 'interests', sanitize_text_field($_POST['interests']));
    update_user_meta($user_id, 'sport_attitude', sanitize_text_field($_POST['sport_attitude']));
    update_user_meta($user_id, 'occupation', sanitize_text_field($_POST['occupation']));

    update_user_meta($user_id, 'birth_date', sanitize_text_field($_POST['birth_date']));

}

add_action('personal_options_update', 'save_custom_user_profile_fields');
add_action('edit_user_profile_update', 'save_custom_user_profile_fields');